The photos that follow, illustrste the various stages and methods of construction.
This was not built from a kit. I had to design it from photographs, the main dimensions and a very small (a5) 3 view diagram. That is why there is also a description of how I carried out the construction.
Dimensions of an Avro Vulcan B2

 1. Skeleton of the Main fuselage - without the nose and tail cone Note - this section includes the wing roots which contain the four engine nacels 22nd March 2008
The partially completed nose cone is in position and the canopy hangs on the side.
 3. A Photo of the undercarriage with the removable part of the Nose Cone in the rear.
 4. The full (unsheeted) skeleton - Illustrating all of the ribs and the spars. The nose cone is complete.
 2nd June 2008
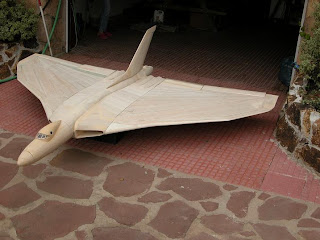
 5. Sheeting has been completed on the underside and the Elevators, Ailerons and the leading edges have been constructed 16 July 2008


 5. Sheeting has been completed on the underside and the Elevators, Ailerons and the leading edges have been constructed 16 July 2008
6. The aircraft is fully sheeted and ready to be smoothed and primed.
28th September 2008

8. Just about ready for the top coat - 4th Nov 2008

and here is the completed Vulcan
2 comments:
Hi Vulcan12,
Fantastic version of one of the greatest aircraft ever built. I have been looking at a self design build of a vulcan but not shure where to start. It must have taken you hours to design. Could you tell me where you started with your design and any tips you could give.
Cheers
mondyo
Hi Mondyo
If you still want more info, send me an email at reg.homden@googlemail.com.
Post a Comment